Main Menu - Misc. - Clothing/Textiles - Medieval Wales - Names - Other Medieval - Publications - Harpy Publications
by Heather Rose Jones
copyright © 2001, 2003 all rights reserved
I haven't confined myself to medieval material here, because the continuity through time of certain approaches is interesting. My earliest examples are from Bronze Age Denmark; there is a group from early Iron Age finds at Hallstadt; some interesting early linen examples come from Pharaonic Egypt; the woolen examples continue with sub-Roman finds from Germany and Denmark; and the largest variety of fabrics and techniques comes from the Middle Ages proper. I've labelled these respectively as: Bronze, Hallstadt, Egypt, sub-Roman, and Medieval.
There are two general parameters that affect the choice of stitch or seam type: the type of fabric, and the purpose of the seam. Linen and silk are more prone to ravelling than wool, and this needs to be dealt with in the seam. The two main purposes for seams are to join two fabric edges into a single plane, and to finish a raw edge. Other minor purposes may be to fasten two pieces of fabric laid on top of each other (i.e., quilting), to gather a long piece of fabric to attach it to a shorter piece, to create or reinforce small openings (eyelets and buttonholes).
RST = right sides together; WST = wrong sides together although this refers mostly to the outer and inner sides of the finished garment, since most of these fabrics are structurally identical on both sides.
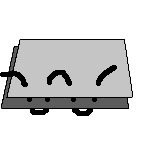
A running stitch is done through one or more layers of fabric (but normally two or more), with the needle going down and up, down and up, in an essentially straight line. It is pretty much the only stitch where several stitches can be taken at a time on the needle before drawing the thread through. The thread forms a dashed line. The running stitch has very little elasticity and may break if used on stretchy fabrics or on the bias.

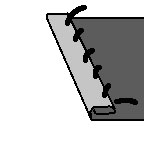
The standard overcast stitch is done through the edge of one or more layers of fabric. The needle goes through the fabric from one side and then is brought around the edge to go through the fabric again from the same side. The thread forms a spiral, going around the cut edge.
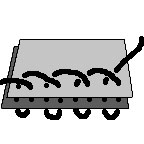
The hem stitch is used to tack an edge (either folded or not) down to a flat fabric the name comes from its use in finishing folded hems. The edge is held down flat against the main fabric and the needle is passed down through the main fabric alone, then up through all the layers, then this is repeated. The thread forms a series of diagonals crossing the line of the edge. This stitch is somewhat elastic, due to the zig-zag path of the thread. The overcast and hem stitches are very similar in structure.
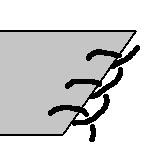
The back stitch tends to be used for seams when a significant amount of elasticity is needed, such as with seams on the bias. The stitch is done similarly to a running stitch, but each stitch backtracks when it comes back up through the fabric, resulting in a looping thread track. On the working side of the fabric, the thread appears in a series of overlapping lines; on the back side, it appears to be a running stitch.
The primary use of the blanket stitch is to finish edges, especially cut edges, but it is also commonly used to finish eyelets and buttonholes. (It may also be called "buttonhole stitch".) It is produced similarly to the overcast stitch, but after the needle goes through the fabric, it catches the loop of thread, resulting in a series of L-shaped stitches along the edge of the fabric. This stitch is also somewhat decorative. In one case, two selvedges have been joined by using a blanket stitch that alternates which side of the seam the stitch goes through.
Herringbone tends to be a decorative, rather than a structural, stitch. Think of it as doing two parallel rows of backstitch where you alternate which row you're sewing with each stitch. The stitch is very elastic. The working surface shows a zig-zig with an X at each point, the underside shows two parallel dashed lines.
This site belongs to Heather Rose Jones. Contact me regarding anything beyond personal, individual use of this material.
Unless otherwise noted, all contents are copyright by Heather Rose Jones, all rights reserved.