Main Menu - Misc. - Clothing/Textiles - Medieval Wales - Names - Other Medieval - Publications - Harpy Publications
As with my “no-sew Viking shoes” class, the title of this class is intended more as advertising copy than as an accurate description of the shoe style involved. This shoe style is drawn from a much small group of examples than the "Viking" class, and the scope in which the style is found is much more restricted in time.
I’ll repeat my basic premise for this series of shoe classes: People tend to be intimidated by the idea of making and wearing historically accurate shoes. While the skills needed for the most common types of shoes — and particularly later period shoes — are moderately advanced, my goal in this (and previous incarnations of this class) is to present a non-threatening alternative to giving up entirely on wearing historically accurate footwear. I have chosen shoe styles, not for their typicality (which they aren’t) but for the simplicity of their construction and the ability to make them with relatively simple tools and techniques. If you can do a summer-camp level leather project (e.g., wallets, moccasins, or belts) and you can handle utility knives without removing portions of your anatomy, then you can make the shoes in this series.
The shoe type presented in this class is characterized by being constructed from a single piece of leather, having a low ankle, and having an upper formed by a network created by cutting slits in the leather. I have only two good examples of this style, both from Northern Europe in the sub-Roman period. Even with only two examples, there are significant differences: one shoe is entirely unshaped in the heel, while the other has a fairly shaped heel with an additional piece of leather sewn on top. I have interpolated between these two features and brought in the evidence of other shoes of this era (see last year’s class) to suggest a semi-shaped heel that is laced with leather rather than sewn. This means that my suggested pattern does not duplicate either of the existing models, but rather has been adapted (following other period models) for ease of construction and comfort of fit.
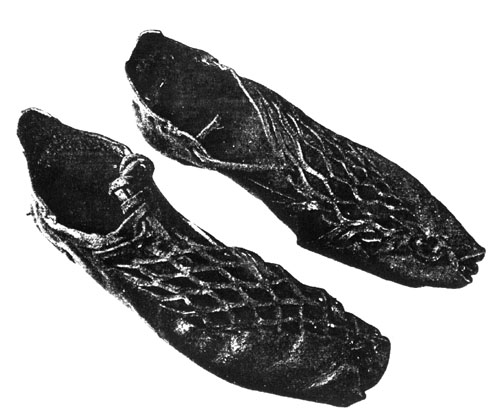
The first pair (and both shoes of the pair survive) was found in 1900 at Damendorf
Mose in South Schleswig (in Germany, at the base of the Jutland peninsula. They
were found in a group with a cloak, a pair of breeches, a leather belt, and
a pair of foot-wrappings. Although they were found accompanying a body, he does
not appear to have been wearing the garments -- the shoes were wrapped in the
breeches and laid at the man’s feet. (Schlabow 1976 p.17. Hald 1972 p.54f.)
I can’t find anyone willing to date the find closer than “Migration
Era”. (The lack of any basis for a more specific date is mentioned by Jørgensen
1991 p.57.)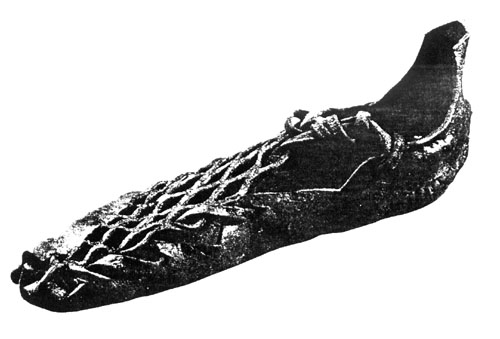
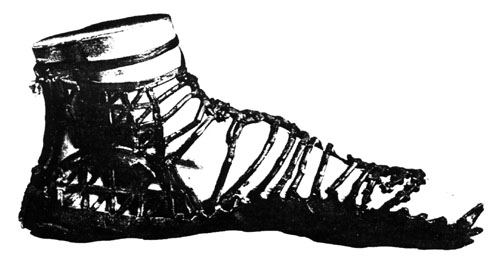
The shoe is formed from a piece of leather that is roughly rectangular. There is a rounded cut around the heel with notches cut out so that the sides can be curved around the heel part and sewn to shape. On top of the edge of this, a trapezoidal piece of leather has been added (with the long edge attached to the body of the shoe) to cover the back of the ankle. (One might speculate that the purpose of this extension is to avoid chafing from ties around the ankles.) The foot is not centered on the leather -- there is slightly less width in the leather on the inner side than the outer. Small slits are cut into the edge of the inner side, and the outer side has rows of parallel slits, offset in each row, that expand to form a mesh. (If you’ve ever examined one of those plastic mesh lettuce-bags you sometimes get iceberg lettuce in, it’s exactly the same principle.) Hald indicates that the slits on the inner edge of the shoe are triangular cutouts, and shows the edge cut into protruding points to accommodate them, but I believe this has not accounted for the distortion of the leather from the lacing. It makes far more sense that the cut edge was straight and the openings were originally mere slits. The two edges (the slit one and the mesh one) are laced together with a strip of leather that is cut in one with the shoe, attached to it around the location of the big toe (for all this, see the diagrams). It is unclear from the pictures and descriptions whether this same lace is used to fasten the shoes across the instep, or whether that would be a separate piece.
The second shoe comes from Wijster, and is dated very roughly to “the Roman period” on the basis of the constructional style (a dangerous way of dating artifacts). The shoe is made of cow leather and the basic shape is an elongated oval. Again, there is slightly more leather left to the outer side, and it has several rows of offset slits, while the inner side has a single row of slits. Here there is no evidence of an integral lace, so presumably a separate lace would have been used to fasten the two edges together. The heel is completely unshaped, and the diagrams show a slight fold in the leather at either side of the ankle. In order to keep the shoe in place, there must have been a fastening strap or lace passed around the back of the heel.
Examples of shoes from this general era that are found in situ, as worn, typically are worn over cloth wrappings on the foot. (These wrappings are often simply rags, clearly recycled from some previous garment.) The shoes may also be stuffed with dried plant matter (hay, moss, etc.) both to cushion the soles and to provide additional insulation.
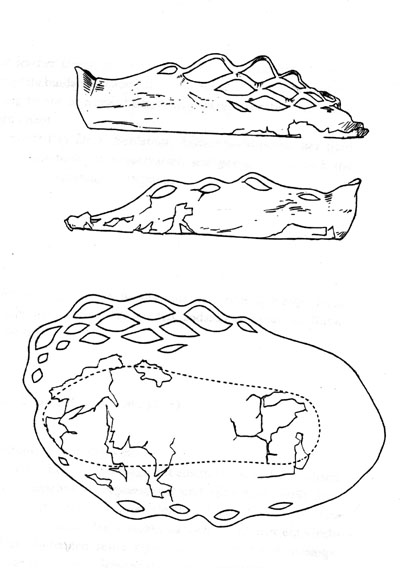
There are other shoes of a similar era that are cut in net-like patterns, where the net is formed by cutting or punching out sections of the leather, rather than by opening up a mesh of slits in the leather. These, in general, have a much more sophisticated appearance, and the technique may be applied to a large variety of shoe styles, since the netted appearance is not part of the functional structure of the shoe. Here is an example of this type from a 2nd or 3rd century Roman site.
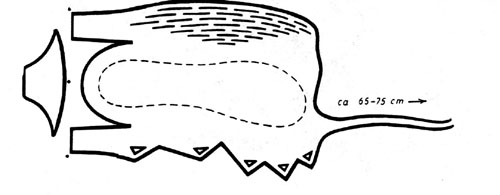
When developing a pattern for this shoe, there is only a certain amount that can be worked out ahead of time, since the precise dimensions will depend on how closely you set your rows of slits, and how many rows you make.
When you make your pattern, you should be wearing on your foot approximately what you plan to wear inside these shoes, i.e., socks or hose of similar thickness, or cloth wrappings if you intend to go that route. If you plan to use any sort of added internal sole (see below), you should use something to approximate it. While I have never tried this, it may be possible to construct shoes of this type around a commercial insole or possibly even whole-sole orthotics, which you would also need to have present when making the pattern. At a minimum, I tend to advise people to use some sort of cushioning on the sole -- a simple piece of thick felt works very well, or commercial insoles would have a similar effect.
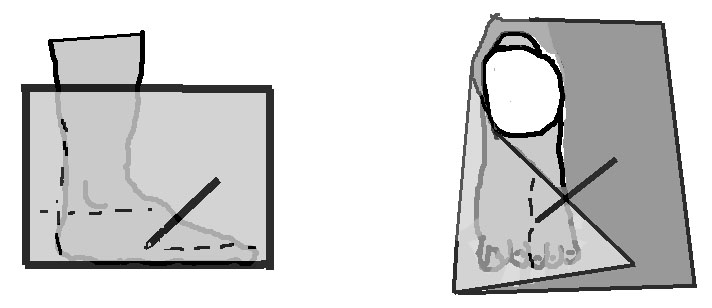
Take a piece of heavy paper (my favorite is brown paper grocery bags, simply for strength and cheapness) and trace around your foot, just for reference.

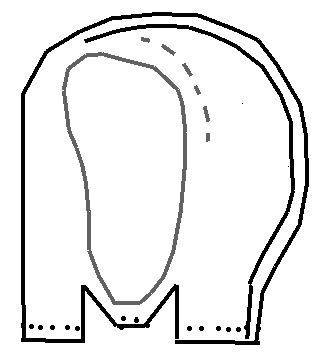
Fold the paper up on the sides of your ankle and mark a line parallel to the ground approximately where you want the top edge of the shoe to be. For this style, I advise putting the edge approximately at the knob of the anklebone or only slightly low.
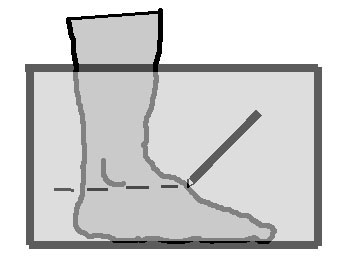
Press the paper together behind your heel so that it meets in the mid-line and draw a vertical line at that point. Keep in mind that you will not be needing any seam allowances for these shoes — all the seems will have butted edges.

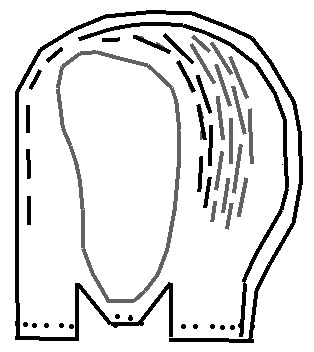
Now fold the paper up along the edges of your feet. On the inner side of your foot, mark a line just at the top of the ball of your foot. Lay the paper flat and connect this line with the mark at your ankle. The line should be close to parallel with the axis of your foot (the shoe goes up slightly higher on your ankle, but your foot is narrower there). On the outer side, mark a corresponding line, then fold the paper over the top of your foot and mark a line roughly along the mid-line of the top of your foot. Flatten the paper and connect this line smoothly with your ankle mark. At the toe, you’ll want the pattern to extend just enough beyond your toes to form a slight “lip” -- no more than half or 3/4 inch unless you have huge feet. Connect this mark with your side-line marks in a smooth oval curve similar to what you see in the diagram.
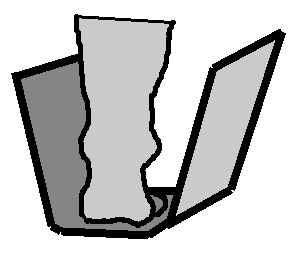
Flatten the paper and work on your heel. The marks indicating the center back line should more or less form a straight line with each other -- if not, straighten the line to the farthest back point of your lines. Place a mark at the midline about half to 3/4 inch behind the end of your heel. Now draw parallel lines on either side of your heel. Connect the mid-line mark to these lines as close to your foot outline as possible without intersecting it. (See the diagram for clearer information.) The resulting triangles on either side of your heel will be cut out, and the central tab will be folded up behind your heel and caught in the first couple lacing stitches.

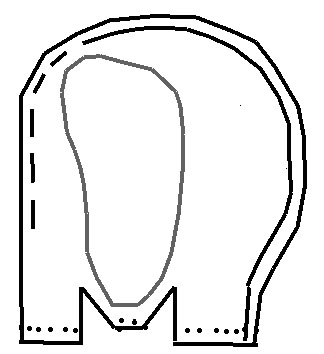
The down side of this particular style is that it’s impossible to make a complete mocked-up pattern in paper because paper doesn’t stand up well to being stretched out in a mesh. The up side is that the fit over the top of your foot is quite adjustable since you can always enlarge it by adding another row of slits, or decrease it by slicing off the outermost row of slits entirely.
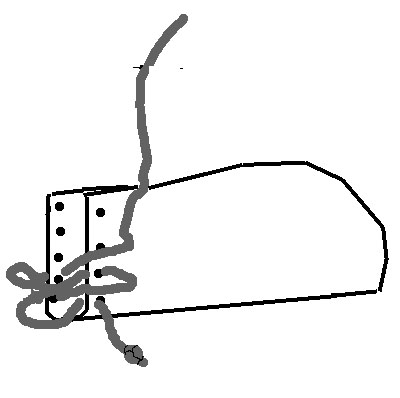
Mark your shoes on the leather, making sure you have one of each “side”. Add roughly an extra inch to the “outer” edge of the pattern to give you some room to play. Then mark an “integral lace”, starting around your big toe and curving around the outer edge of the pattern. If you continue it to the heel line, it will be plenty long enough to fasten the instep of the shoe, but you will probably want a separate lace to fasten the shoes for wearing.
Cut the leather out with a sharp knife, carefully separating the integral lace without cutting it off entirely. Make sure you cut out the triangles on either side of the heel. Punch lacing holes along both sides of the heel seam and a pair on the central “point” at the heel.
On the inner edge of the shoe, starting just forward of the knob of your ankle and continuing to just before your lace starts, cut a series of short slits about a quarter inch in from the edge. A good proportion is to use one inch slits separated by half an inch.
This is a good time to put the heel together. It will make cutting the lattice a little more difficult, but will make it much easier to check the fit as you cut it. Take a lace, tie an overhand knot in one end, and put it through the first lacing hole at the base of the heel seam. Make sure the knot is on the outside or you’ll be sorry. Run the lace through the holes in the heel tab (outside to in, inside to out) then out through base of the other side of the heel seam. Lace up the sides of the heel with a spiral stitch. You probably won’t want to tighten the heel seam enough to pucker the leather (although some of the historic examples do — you could experiment), but the edges should meet firmly and the lace should lie as flat as possible. When you’ve finished, make sure the loose end is on the outside of the shoe and tie another overhand knot.
Now for the tricky part. Mark your “lip-line” on the outer section of the shoe. This will be the starting line for your mesh slits. As you add more rows of slits, you will position them relative to this line of slits, even though they may not be entirely parallel (especially at the toe). This base-line should start around the mid-front of your foot and end at a point approximately equivalent to the front of your ankle.
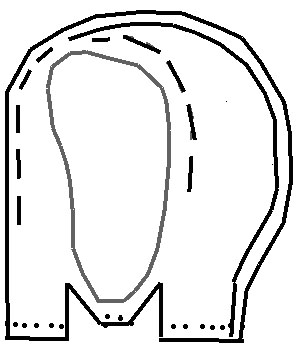
Cut a line of slits at this line -- start with the same proportion as above (one inch slits separated by half and inch) although you may want to lengthen the slits slightly later. Now you’re going to add more rows of slits, one at a time, and check for fit after each row. Each new row will have a slit centered on the non-slit portion in the previous row and should be no more than a quarter of an inch from the previous row. (It’s actually best to place them as close as possible without accidentally cutting through the meshes.) The new row will follow the curve of the previous row in parallel, and where it goes around a curve, make sure you align the slits properly rather than simply making them a standard length. If, at any time, there is no room to add new slits between the last row and the edge, don’t add any. (This will happen first around the toe.) This is normal. At the ankle end of the slit lines, continue extending the slits further back with each row.
After you have three rows of slits done, fit the shoe and stretch the mesh section to cover the top of your foot. Your eventual goal is to have the slits in the mesh section reach over to meet the opposite edge not to have the edge of the mesh section reach it. (Remember that we added some “ease” in the leather -- you should end up trimming it off in the end.)
If the slits don’t want to “open up” when you pull on the leather, you may need to make them longer (and the intervening non-cut portion correspondingly shorter). Carefully lengthen each slit at both ends so that the connections remain centered between them. A special note on cutting: you will have better control in cutting the slits if you stick to pressing the knife down through the leather and then moving it and pressing again, rather than trying to pull the blade through the leather. Not only are you less likely to ruin your leather this way, you’re much less likely to slice off fingertips and whatnot. When lengthening slits, start your blade at the new length and cut back towards the existing slit rather than cutting away from the existing slit.
If the mesh section doesn’t reach far enough across your foot, add another line of slits and test it again. Repeat until it works. Now trim off the excess leather, leaving about a 1/4” edge after the last row of slits. Put your foot in the shoe and, using your integral lace, begin lacing the edges together using the outermost slits. If they don’t correspond one-to-one, double-up as necessary to make them fit. Figure out how far up you can fasten the edges together and still be able to get your foot in and out, and then knot your lace there in some fashion (e.g. an overhand knot around the last slit).
If you have enough length left on your integral lace, you can use it to fasten the shoe as well. Make a slit at the edge of the shoe about in line with the knob of your ankle, run the lace up through one, across and through the other, and then back to tie to itself (e.g., with a single-bow overhand knot). If your integral lace isn’t long enough, trim it off where you tied it and cut a new lace from scrap leather, long enough to go between the above-mentioned slits and then come back to tie together.
My best experiences have been with a medium-weight, fairly soft cowhide. I tend to go more by “feel” than by numeric measures of the thickness. This weight of leather, however, does not afford the sort of protection on the soles that one tends to need on hard surfaces. For this reason, I strongly advise taking a page from how these shoes were worn historically and using some sort of insole. I tend to like removable ones, so that I can use the same insoles with several pairs of shoes. I’ve had good luck using insoles made of a heavier, stiff leather (not necessarily as heavy as sole leather, but heavy oak-tan is good), or of felt (a nice first project for learning how to make felt!). Commercial insoles should also work, although I’ll always encourage people to try historic alternatives first. You could also make insoles from scrap fabric — wool is the usual material, and it will probably felt itself up after some wear.
These shoes will wear out. They aren’t designed to be ten-year shoes, they’re more the moral equivalent of the cheap tennies you buy new every summer. Don’t be afraid to wear them until they have holes in the soles and then throw them out (or put them in the scrap leather bin). That’s part of the idea of being quick and easy to make.
Hald, Margrethe. 1972. Primitive Shoes: An Archaeological Ethnological Study Based upon Shoes Finds from the Jutland Peninsula. The National Museum of Denmark, Copenhagen.
Jørgensen, Lise Bender. 1986. Prehistoric Scandinavian Textiles. Kongelige Nordiske Oldskr, Kobenhavn.
Schlabow, Karl. 1976. Textilfunde der Eisenzeit in Norddeutschland. Karl Wachholtz Verlag, Neumuenster.
Van Es, W.A. 1967. “Wijster: A Native Village Beyond the Imperial Frontier 150-425 A.D.” in Palaeohistoria, XI: 138-141 (this is the section on shoes only).
This site belongs to Heather Rose Jones. Contact me regarding anything beyond personal, individual use of this material.
Unless otherwise noted, all contents are copyright by Heather Rose Jones, all rights reserved.